
Core Concepts
Self-Service Workflows
What Is a Self-Service Workflow?
Self-Service Workflows (SSWs) are CodeCargo automations that allow you to run GitHub Actions Workflows, defined in your GitHub Organization, from our UI. CodeCargo provides unique ways to discover, organize, and share these automations within your organization.
SSWs allow you to run GitHub Actions Workflows that are called by the workflow_dispatch event trigger using the CodeCargo UI. These workflows are stored as code in your GitHub organization. You can create these workflows by yourself, or with the help of GenAI coding agents including CodeCargo's Expert Workflow Agent.
Scope
When you create an SSW in CodeCargo, you can do so in two places:
- A single Project
- CodeCargo Organization
SSWs that are scoped to a single Project are created in the Self-Service tab of the Project UI. Anyone who is a member of that specific project can run the SSW, assuming they have write permissions on the GitHub repository where the underlying dispatchable workflow is defined.
SSWs that are scoped to your CodeCargo Organization are created in the Self-Service dashboard on the left-nav menu. Any member of the GitHub organization can run the SSW, assuming they have read permissions on the GitHub repository where the underlying dispatchable workflow is defined.
If you want a small group of users to run an SSW, create it in a single Project. If you want a few groups of users to run the SSW, you can recreate it in multiple Projects. If you want a large group of users to run the SSW, create it for your entire CodeCargo Organization, and give the target users read permissions or higher for the underlying GitHub repository.
Which token runs the SSW?
The token used to run an SSW is determined by its authorization mode (set in the Permissions step), not by its scope. In GitHub User mode, the workflow runs with the individual's GitHub user token. In either GitHub App mode (Entire Org or Restricted), it runs with the GitHub App's token. See Permissions Configuration below.
Requirements and Permissions
To create an SSW, you need the following:
- A GitHub Actions Workflow, triggered by
workflow_dispatch - CodeCargo must have access to the GitHub repository where the workflow is defined
- Single Project SSWs - your GitHub repository must be part of the Project
In addition, you need appropriate permissions in the CodeCargo platform:
- Single Project SSWs - Project Admin or Project Editor
- Organization SSWs - Org Admin or Org Architect
Create and Configure an SSW
Creating an SSW scoped to either a single Project or your entire CodeCargo Organization follows the same process once you are on the appropriate page:
- Click the button to create the SSW
- Select the dispatchable workflow you'd like to use
- Configure the SSW
Steps 1 and 2 are very straightforward; however, there are a lot of configuration parameters for step 3 that allow you to fully customize it for your users.
Configure the SSW
General Configuration
CodeCargo provides extensive configuration parameters for your SSW. As you begin, you'll need to provide values for the following options:
- Git Ref: choose the branch, tag, or commit for your workflow. This will determine which version of your workflow will run when a user executes the SSW
- Name: this user-visible field will provide a name for your SSW
- Icon (Optional): this user-visible field will provide an icon for your SSW
- Description: this user-visible field will provide a description for your SSW
Input Customization
CodeCargo provides fine-tuned controls over SSW inputs. This allows your users to run the SSW in a way that is customized to them. For example, you might create an SSW to Deploy an Azure VM with name=X, deployed to resource group RG=Y, and connected to network=Z. You can customize the SSW inputs to ensure they are flexible enough to help users get their jobs done, and include constraints so they don't cause issues.
CodeCargo reads the underlying GitHub Actions workflow file to populate this list of inputs from the workflow_dispatch trigger definition. Inputs can include text, boolean, and number types, as well as choices whose values are populated from the repository's GitHub Environments. For each input, you will be able to specify the following configuration options:
Restrict Choices [Y/N]
If checked, change the user input from a basic textbox into a dropdown with a limited set of choices. Optionally, you can add a label to each choice. If you add a label, the user will see the value of the label instead of the choice. This is useful because your users might recognize prod-aws-region over useast1
Value Type [User Input/Fixed Value]:
- User Input – Creates an interactive form field for the user (raw input or selection)
- Fixed Value – Hardcoded for consistency, not changeable by the user
Description [text]
Users can specify the description for an input in the yaml file that defines the workflow. Use this field to override the description to fit your specific use-case.
Required [Y/N]
- If an input is marked as
requiredin the workflow'sworkflow_dispatchinputs section, a value for this input must be provided in the UI form. This field cannot be changed. - If not marked as
requiredin the YAML file- You can optionally mark it as
requiredto force the user to provide a value - You can leave it alone and the user does not need to fill it out
- You can optionally mark it as
Default Value [Y/N]
Workflows can define default values in their yaml file definitions. Check this field to override the default value of this input. If you override the input value, you must provide your own.
Fixed Value Inputs [Y/N]
If you set an input's Value Type as Fixed Value, it is your job to specify a value for the input. The user will not be able to enter any value(s). This is useful if you want to specify inputs that you do not want your users to edit. If you set Value Type as Fixed Value, the UI will gray out the variable in the center of the screen and push it to the bottom of the form.
Permissions Configuration
After configuring your SSW's general settings and inputs, you'll proceed to the Permissions step. This step allows you to control who can run the workflow by selecting from three authorization modes:
GitHub User
- Users with read-write access to the repository can run this workflow
- Uses individual GitHub user tokens for execution
GitHub App (Entire Org)
- All users in the organization can run this workflow
- Uses the GitHub App token for execution
GitHub App (Restricted)
- Only specific users and teams can run this workflow
- Uses the GitHub App token for execution
- Allows you to add individual users or teams as authorized accessors
When you select GitHub App (Restricted), you can:
- Add specific users by searching and selecting from your organization members
- Add entire teams to grant access to all team members
- Remove accessors at any time
- View a table of all current authorized users and teams
Authorization Flow
The SSW creation and update process follows a consistent two-step flow: first Configure, then Permissions. This ensures proper authorization is configured for every workflow.
Running an SSW
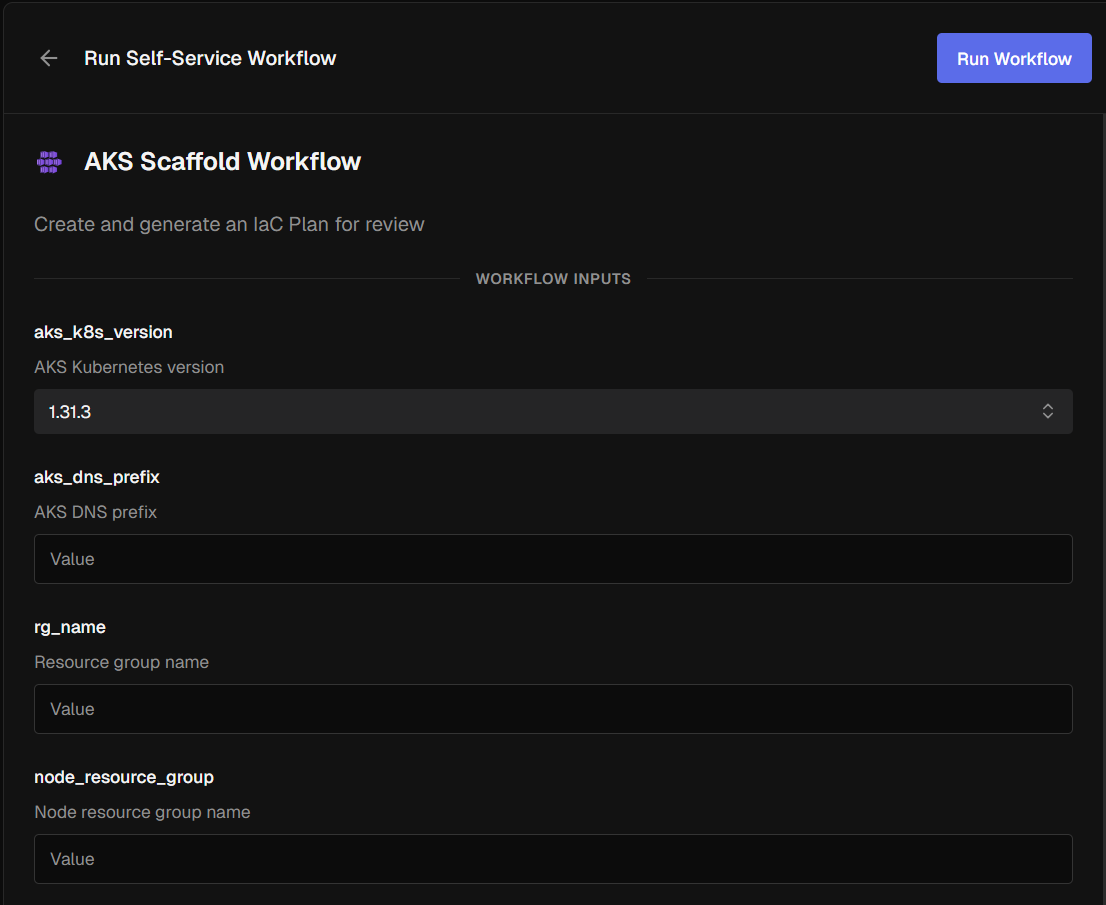
When a user clicks Run Workflow on an SSW card, they are taken to the run form.
The Run Form
The form displays all configurable inputs defined during SSW creation. Input types include text fields, dropdowns (for restricted choices), number fields, and boolean checkboxes. If the SSW administrator configured environment-based inputs, those appear as dropdowns populated from the repository's GitHub Environments.
- User Inputs appear at the top of the form as editable fields
- Fixed Values appear in a separate section at the bottom, grayed out and non-editable
- If the workflow has no inputs at all, the form shows a "Ready to run!" message — just click Run Workflow to start
All required fields must be filled before submission. Validation runs on blur and blocks submission until resolved.
Run Status States
After dispatching a run, CodeCargo tracks its progress through the following states:
| Icon | Statuses | Meaning |
|---|---|---|
| Spinning refresh (amber) | Requested, Queued, Pending, Waiting, In Progress, Action Required | Run is in progress or waiting |
| Green checkmark | Success | Workflow completed successfully |
| Red octagon | Failure, Timed Out, Stale | Workflow failed or errored |
| Gray minus circle | Cancelled, Neutral, Skipped | Run was stopped or not applicable |
The UI automatically polls for status updates every 5 seconds while a run is in progress (up to 8 hours after creation).
Workflow Unavailability
Self-Service Workflows can become unavailable if their underlying GitHub Actions workflow is no longer accessible. This happens when:
- The workflow file is moved or deleted from the repository
- The workflow is removed from the repository's default branch
- The workflow no longer declares
workflow_dispatchas a trigger - The configured Git ref (branch/tag/commit) no longer exists
When you try to run an unavailable workflow, CodeCargo displays a clear message explaining why the workflow cannot be executed, rather than showing a generic error page.
Workflow Status
Workflows that appear in the SSW creation picker are guaranteed to be available at creation time. However, they can drift out of a runnable state after the SSW is created if the underlying workflow changes.
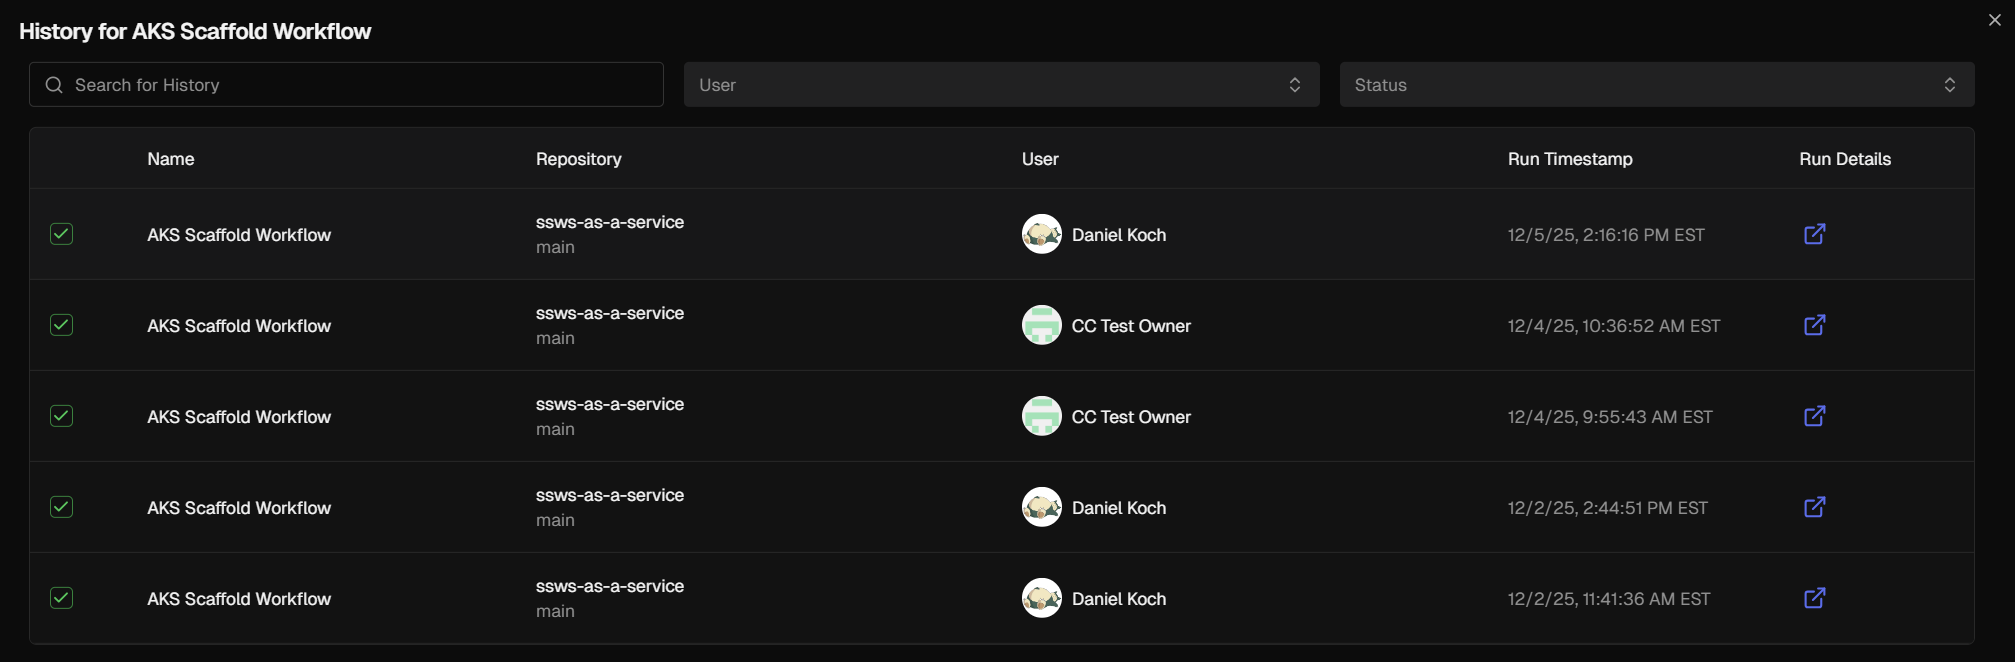
Viewing Run Details
Click on a run from the history list to see its full details:
- Status — current status with icon
- Repository — the repository and default branch
- Run Timestamp — when the run was dispatched
- User — the GitHub user who triggered the run (with avatar)
- Run Details — an external link to view the run in GitHub Actions
- Submitted Inputs — all input values that were provided at execution time
Run History
You can view SSW run history in two places:
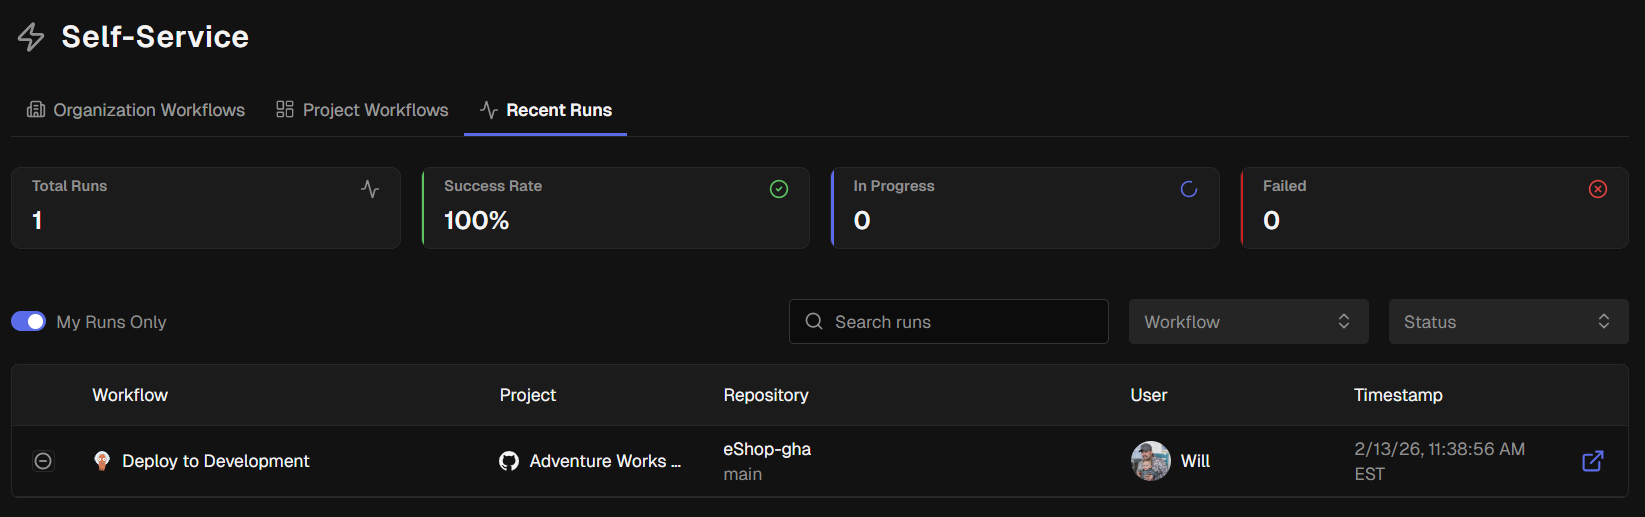
Organization-Level Recent Runs
Navigate to Self-Service → Recent Runs from the organization sidebar. This shows all SSW runs across the organization with statistics cards:
- Total Runs — overall count
- Success Rate — percentage of successful completions
- In Progress — currently active runs
- Failed — runs that ended in failure or timeout
Project-Level Recent Runs
Navigate to a project's Self-Service → Recent Runs tab for a project-scoped view of the same data.
Filtering and Search
Both views provide filtering controls:
- Search — search across workflow name, repository, and user
- Workflow — filter by specific workflow
- User — filter by the user who triggered the run
- Status — filter by current run status
"My Runs Only" Toggle
Enable the My Runs Only toggle to show only runs you personally triggered. When active, the User filter is hidden since results are already scoped to you.
Start Building
Quickstart Guide
Get started with CodeCargo and create your first Self-Service Workflow.
Building Blocks
Learn how to manage and share reusable workflows across teams.
GenAI Editor
Use AI to build and modify workflows from natural language descriptions.
GitHub Integration
Understand how CodeCargo integrates with GitHub.